Update: I have finally got around to finishing this series so I thought that I would reshare this post so that I could post all the posts in succession of each other. I decided to re-write/ edit this post to add more information, imagery and to fit in with my vision for this series.

In Today’s post I will be resharing with you my image for Fire, I renamed this image ‘Phoenix’ as I wanted to name all my image something that represented the elements they were inspired by but without using the obvious names.
This was the first Element that I started with because It was the first one I was really drawn to and could come up with a concept for. I really wanted to go for something dramatic but a little bit rough around the edges, so a lot of texture.
I had thought about redoing this concept to fit in with my other image but I really think this just fits well for the concept so I decided to leave it as is.

Phoenix (Inspired by The Fire Element)

Makeup
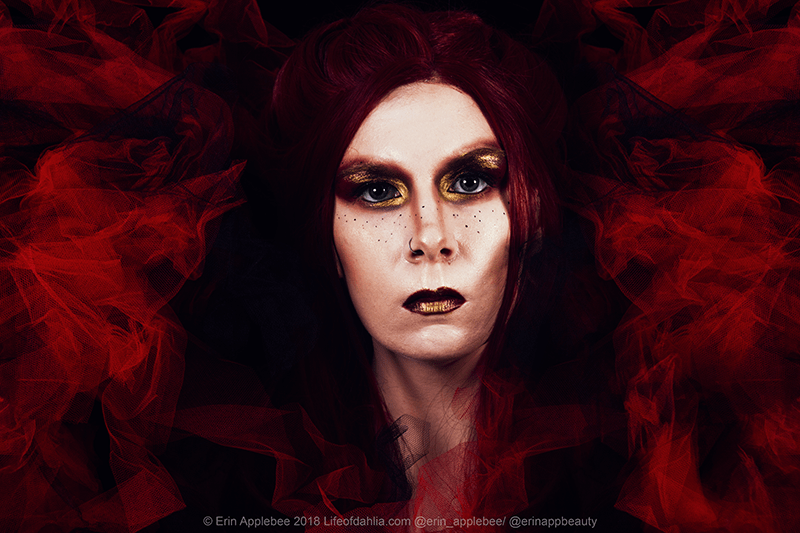
This look kind of put itself together I had no real idea what I wanted to do when I started, I just went with what felt right at the time. I knew that I wanted to use a lot of red in this look but I also wanted to add in elements of black and gold in there as well.
I decided to include lots of texture so I decided to create a wing shape that went all the way out toward my hairline and add some texture with the blending out around my eyes to represent flames.
I wanted to add in some gold, to add a pop of brightness to the inner corner and then brought it up to the eye to create some texture on top of the red.
I added in the little black dots as if the fire was burning and it was soot or ash falling on my cheeks, I really wanted to use a flicking motion to get a more random effect but, unfortunately, I just couldn’t get that to work so I decided to just do small dots instead.
For the lips, I decided to add in some similar colours to the eyes, I was originally going to do a nude so that the eyes were the focus but it looked incomplete so I decided to match the lips to colours in the eyes instead and I really like the way it came out.
Inspiration
I really wanted all the looks that I created for this series to stand out on there own, I wanted them to incorporate and represent their own elements. For fire, I decided to go with a more editorial look as I wanted it to have texture and colours that represented the Element.
I’m so happy with the way this look came out, I have been really struggling lately with finding inspiration and being able to execute it into something original. Its been a long time since I’ve created something that feels like art, I think I just need to realise that maybe my art is changing and is different from what I imagined it to be.
To create texture in my image I used a homemade tutu that I had made up for photo shoots, I just thought that the colours would go really well and it would help with the flame look I was going for.
The Photographing & Editing Process
After creating my makeup look and taking some photos, I imported my images into Lightroom, from here I like to narrow down the photos I took before importing anything into Photoshop. Lightroom allows me to find the best image and make some basic changes before getting into the deeper editing process.
For this image, I didn’t have to do a lot of editing (you can see my editing process in the video above), I mainly had a few tweaks and add in some of the tulle into one area to give a more symmetrical look.
In the video above I show two images I edited for this element, I mainly did this so that I could share them on Instagram.
I’m so happy to be able to share all my images from this series with you. I will also be sharing everything on my Instagram pages, I’m excited to share it there and see all the series together.
Instagram: Beauty: @ erinappbeauty, Personal/Art: @ erin_applebee
Until next time, I hope you have a lovely day.

Image Credits:
Photo featured in cover image is by Tucă Bianca on pexels.com, Photo featured in Featured Cover Banner by Vlad Bagacian on pexels.com
Video Intro Image Credits:
Candle: https://www.pexels.com/@tuca-bianca-116780
Bonfire: https://www.pexels.com/@vladbagacian
Video Music Credits: Meadow by Density & Time
Disclaimer – This post is not sponsored and doesn’t contain any affiliate links, links included are for reference only in case your interest in checking out anything mentioned in this post. Read full Disclaimer here.
If you liked this blog post check out some others below, alternatively you can also follow my blog to receive notifications whenever one of my posts goes live.


